Form on Visual C++ .NET

long time being friendship with C# but sorry fren, I’d like to leave you. (hi hi sementara aja)

programming d VC++ .net memang rada ribet dari sononya apa gw yang terlalu bahagia sama C# yak wkwkwkwkw, 5 taun lalu maenan QT tp karna ‘sesuatu’ gw akhirnya mutusin dia dan berpaling ke C#, biasa masalah rupiah. an engineer must be always survive on all extreme conditions itu kata nene moyang gw. smp maenan pascal, sma maenan vb, kuliah maenan c/c++, delphi, java, .net, python baguslah daripada gw maenan cewek. wkwkwkw

cukup dah ngemeng2, ini adalah standart template yang gw buat untuk develop aplikasi desktop pake V++ biar ada form nya.

jika ada error itu pasti adalah system linkernya yg kaga peka *wats de relationn tomms!!* kamsud gw stdout mau di kemanain console apa windows, nanti bisa di cek di :

properties->configuration properties->linker->system->subsystem

cek pilihannya Windows/(/SUBSYSTEM:WINDOWS)

terus klo masih ada error lagi, kampret emang… cek lagi di marih :

properties->configuration properties->linker->advanced->Entry Point

nanti tulis “main” program yang ada di project itu.


untuk template-nya bisa di unduh di sini..iya disini…

Form on Visual C++ .NET

Interfacing IMU MPU6050 with minibian-raspbian Rpi

Hi, All….

mpu
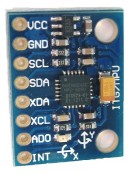
gambar modulnya
MPU6050
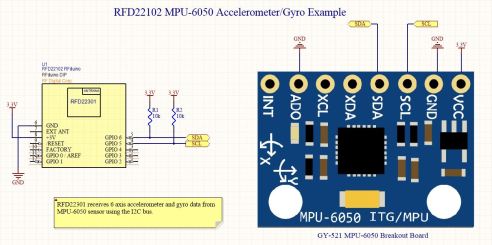
wiring diagramnya


ini ada cheap IMU, inertial measurement unit, harganya gak nyampe 200rban, 6axis. dengan komunikasi I2C. worth it lah dengan harga sgitu sih. lets go…

the first thing that u have to do is….RTFM RTFD. read the fu*king manual, read the fuc*ing datasheet.

you can downloat it from here :

Click to access PS-MPU-6000A-00v3.4.pdf

and juga register map-nya dari sini :

Click to access RM-MPU-6000A.pdf


nanti sambung lagi ya…

Interfacing IMU MPU6050 with minibian-raspbian Rpi

Eth0 not Found!! after cloning raspberry-pi

ERROR: interface eth0 does not exist

you will get this error if you cloned the active-raspberry pi with existing ethernet device,

why this occurred? wkwkwk its pretty easy, when you move the whole system into the new card and new device, your mac-address change right?, this will be ignored by the cloned system and left it unconfigured.

so, to solve this, just remove the persistent rules as follow :

# rm -fr /etc/udev/rules.d/70-persistent-net.rules

and then reboot the system

its suppose to be ok. Sips, tengkyu……..

Eth0 not Found!! after cloning raspberry-pi

Audio Stream with Raspberry / nix

Hi, Friend! (remembering OUIJA movie that 2 days ago I watched) hehe


with helping of Darkice and Ice-Cast we’re able to brodcast our mp3 to HTTP stream.

here’s the instruction how to set the darkice and icecast on rasp-pi board :

Download darkice source

First, add the Raspbian source repository if it isn’t already loaded. Add this line to /etc/apt/sources.list

deb-src http://mirrordirector.raspbian.org/raspbian/ wheezy main contrib non-free rpi

Update packages and install the darkice dependencies.

$ sudo apt-get update
$ sudo apt-get --no-install-recommends install build-essential devscripts autotools-dev fakeroot dpkg-dev debhelper autotools-dev dh-make quilt ccache libsamplerate0-dev libpulse-dev libaudio-dev lame libjack-jackd2-dev libasound2-dev libtwolame-dev libfaad-dev libflac-dev libmp4v2-dev libshout3-dev libmp3lame-dev

Grab the source package for darkice.

$ mkdir src; cd src/
$ apt-get source darkice

Modify the compilation options to match Raspbian.

$ cd darkice-1.0
$ vi debian/rules

debian/rules should look like this:

#!/usr/bin/make -f

%:
dh $@

.PHONY: override_dh_auto_configure
override_dh_auto_configure:
ln -s /usr/share/misc/config.guess .
ln -s /usr/share/misc/config.sub .
dh_auto_configure — –prefix=/usr –sysconfdir=/usr/share/doc/darkice/examples –with-vorbis-prefix=/usr/lib/arm-linux-gnueabihf/ –with-jack-prefix=/usr/lib/arm-linux-gnueabihf/ –with-alsa-prefix=/usr/lib/arm-linux-gnueabihf/ –with-faac-prefix=/usr/lib/arm-linux-gnueabihf/ –with-aacplus-prefix=/usr/lib/arm-linux-gnueabihf/ –with-samplerate-prefix=/usr/lib/arm-linux-gnueabihf/ –with-lame-prefix=/usr/lib/arm-linux-gnueabihf/ CFLAGS=’-march=armv6 -mfpu=vfp -mfloat-abi=hard’


Beware, ‘make’ wants tabs instead of spaces. To be on the safe side, you can download this rules file instead.

Before you build the new .deb package, change the version to reflect MP3 support:

$ debchange -v 1.0-999~mp3+1

Build and install darkice

Now build and install your custom darkice package.

$ dpkg-buildpackage -rfakeroot -uc -b
$ sudo dpkg -i ../darkice_1.0-999~mp3+1_armhf.deb

Darkice is now installed. To configure it, copy the template config file to /etc.

$ sudo cp /usr/share/doc/darkice/examples/darkice.cfg /etc/

Here’s my sample config file:

# see the darkice.cfg man page for details

# this section describes general aspects of the live streaming session
[general]
duration = 0 # duration of encoding, in seconds. 0 means forever
bufferSecs = 5 # size of internal slip buffer, in seconds
reconnect = yes # reconnect to the server(s) if disconnected

# this section describes the audio input that will be streamed
[input]
device = plughw:1,0 # Alsa soundcard device for the audio input
sampleRate = 44100 # sample rate in Hz. try 11025, 22050 or 44100
bitsPerSample = 16 # bits per sample. try 16
channel = 1 # channels. 1 = mono, 2 = stereo

# this section describes a streaming connection to an IceCast2 server
# there may be up to 8 of these sections, named [icecast2-0] … [icecast2-7]
# these can be mixed with [icecast-x] and [shoutcast-x] sections
[icecast2-0]
bitrateMode = vbr # variable bit rate
format = mp3 # format of the stream: mp3
quality = 1.0 # quality of the stream sent to the server
bitrate = 256
server = localhost # host name of the server
port = 8000 # port of the IceCast2 server, usually 8000
password = *SOURCE_PASS* # source password to the IceCast2 server
mountPoint = raspi # mount point of this stream on the IceCast2 server
name = RasPi # name of the stream
description = DarkIce on RasPi # description of the stream
url = http://localhost # URL related to the stream
genre = Baby # genre of the stream
public = no # advertise this stream?
localDumpFile = recording.mp3 # Record also to a file

Install icecast2 and begin monitoring

Now you’ll need to install icecast2 to stream the audio over the network.

$ sudo apt-get install icecast2

The installer will ask you for a few passwords, make sure you set the source password as the same one for darkice (*SOURCE_PASS* in the sample config above).

Now start icecast2 and darkice.

$ sudo service icecast2 start
$ sudo darkice
DarkIce 1.0 live audio streamer, http://code.google.com/p/darkice/
Copyright (c) 2000-2007, Tyrell Hungary, http://tyrell.hu/
Copyright (c) 2008-2010, Akos Maroy and Rafael Diniz
This is free software, and you are welcome to redistribute it
under the terms of The GNU General Public License version 3 or
any later version.

Using config file: /etc/darkice.cfg
Using ALSA DSP input device: plughw:1,0
Using POSIX real-time scheduling, priority 98

Darkice will run in the foreground (CTRL+C to exit).

Now open up a browser and navigate to http://{Raspberry Pi IP}:8000. Click on m3u and your audio player should play  monitor audio. It even works on my Nexus Phone.

just contact me for the info

satria.nt@gmail.com
 

Audio Stream with Raspberry / nix

Fast Video Streaming using Webcam and MJPG-Streamer Rasp-Pi

Hello Semua,

kali ini I’d like to show you how to setup streaming with webcam,

after using motion as webcam server, I dont get satisfied its because the lag / latency.


this video streaming’ll be use into my private projects that needed video-streaming.

I found that the MJPG-streamer is the most suitable-non-lag-fast-streaming-video-server ever.


ok, just follow these steps ya :-* (centil banget hehe)

1. Install build dependencies

The following command installs the three libraries that MJPG-Streamer uses:

$ sudo apt-get install libjpeg8-dev imagemagick libv4l-dev

2. Add missing videodev.h

The videodev.h header file that MJPG-Streamer needs has been replaced with a videodev2.h. To make MJPG-Streamer happy you have to create a symbolic link:

$ sudo ln -s /usr/include/linux/videodev2.h /usr/include/linux/videodev.h

3. Download MJPG-Streamer

The source code for MJPG-Streamer is available at sourceforge.net, but it is tricky to find the direct download link:

$ wget http://sourceforge.net/code-snapshots/svn/m/mj/mjpg-streamer/code/mjpg-streamer-code-182.zip

4. Unzip the MJPG-Streamer source code

The source code download is a compressed zip file. Put the file in your home directory (or a temporary folder, if you prefer) and run the following to extract the files:

$ unzip mjpg-streamer-code-182.zip

5. Build MJPG-Streamer

MJPG-Streamer comes with several plugins, but only a couple of them are needed to stream video. The command below only builds what’s needed:

$ cd mjpg-streamer-code-182/mjpg-streamer
$ make mjpg_streamer input_file.so input_uvc.so output_http.so

6. Install MJPG-Streamer

The following commands copy all the needed files into system directories:

$ sudo cp mjpg_streamer /usr/local/bin
$ sudo cp output_http.so input_file.so /usr/local/lib/
$ sudo cp -R www /usr/local/www

7. Start the camera

We are almost there. Now it is time to start the camera module:

$ mkdir /tmp/stream
$ mjpg_streamer -i "/usr/local/lib/input_uvc.so -r 320x240 -yuv -f 15" -o "/usr/local/lib/output_http.so -w /usr/local/www"


8. Start MJPG-Streamer

The camera is now writing images, so all that is left is to start MJPG-Streamer:

export LD_LIBRARY_PATH=/usr/local/lib/

9. Watch the Stream!

Now you can connect with your web browser and watch the stream live. If you want to watch from within the same Raspberry Pi you can enter http://localhost:8080 in the browser’s address bar. If you want to watch from another computer in your network use http://IP-address:8080.

10. Cleanup

After you verify that everything is working you can remove the source code:

$ cd ../../
$ rm -rf mjpg-streamer-182

Conclusion

untuk pertanyaan silahkan aja contact me at satria.nt@gmail.com


happy tryin’

Fast Video Streaming using Webcam and MJPG-Streamer Rasp-Pi

On Goin’ my ‘iseng’ Projects

ok, lebaran telah usai..ehehehe back to work, back to solder, tin and a lot of wires.

1. Arm-Robot 6-DOF / honestly this is my Master Degree Thesis, hehe

the target : there’s an alternative cheap industrial robot, made in Indonesia for sure.

Process : 30%

update :

a. Kinematics Modelling Done

b. Cad Done


2. Near Space Communication and Imaginery

the target : testing my own mini-computer board capability in free-fall area and extreme temperature. I’ll using Airmax for the communication link since its written on the datasheet that its support multiKM communication, all of the payload and communication link would be brought by helium ballon into stratosphere (if you didnt know about this please read wikipedia first.hehe).

Process : 1%


3. Drone-Army

yeah, replace all jets with unmanned air-fighter UAV and Spyin Plane

Process : 80%

update :

a. modelling kit using balsa

b. installing servo

c. testing ground control software

d. flight controller re-design


4. Rocket / Propellant

I started research about this after looking at Lapan Rocket, they using solid KNO3 or Potassium Nitrate + Sugar + Propellant Booster like metal dust. I think Indonesia must be active in research about this sector, not only for defense but also for attack, hehe… Hidup Indonesia Tanah Airku!!

Process : 10 %

update :

a. collecting information for regulation of developing military technology in Indonesia

b. looking for Chemistry Shop, hehe, di bogor banyak inimah.


ok, I’ll update periodically klo ada time, hehe


Pemuda yang hebat adalah pemuda yang peduli terhadap bangsanya!


INDONESIA! Rocks


On Goin’ my ‘iseng’ Projects

selamat jalan masa remajaku

life as you know it..

finally i have to face the moment that usually everyone’ll do, yeah I think all of you would guess it easily. hehe…

I should have to think anything that more important than constantly thinking about my self, tommy a workaholic person who is always busy with his business now must to think how to build a great family.

-in silence

depok, july 2014

selamat jalan masa remajaku

adb not running

The more common this problem, the solution is as follows:

1, Enter CMD into the DOS interface, enter the android-sdk-windows\platform-tools directory, execute the following command

Start ADB start-server
The following error occurred
* daemon not running. starting it now on port 5037 *
ADB server didn’t ACK
* failed to start daemon *

2, Execute the following command
adb nodaemon server
The following error occurred
cannot bind ‘tcp:5037’
The original ADB server port binding failed 

3, Enter the following command query which using port 5037
netstat -ano | findstr “5037”
The following information
TCP 127.0.0.1:5037 0.0.0.0:0 LISTENING 1616

4, Open the task manager kill 1616 out of the process

5. Taskkill -pid 1616

adb not running

Enabling Remote Access to MySql

Hello Temans Temans…. this will remind me.. hehe

by default remote access to the MySQL database server is disabled for security reasons.
However, some time you need to provide remote access to database server from home or a web server.
This post will explain how to setup a user account and access mysql server remotely.

case-nya :

1. gw punya server di 240.125.xxx.xxx yang ada mysql-server database-nya

english: I have a mysql-server on 240.125.xxx.xxx

2. nah gw punya client tapi IP-nya dinamics, di pakenya di android, iOS dll

english: and the clients have dinamics IP-Address, that run on Android, iOS or Desktop App

3. gw mau akses / Query dari manapun. untuk menambah atau menghapus atau apapun pada record-nya

english: I wanna access that database or query from anywhere, for adding, remove record etc.

after, 5 minutes googling and confusing and make my head start to blow, I finally found a simple way to do this.

lets start!!!

Login to your Machine

assume that your machine is a *nix machine, you can do this from any-platform, from windows you can

access remotely by using putty ssh, from linux you can directly using ssh.

$ ssh root@240.125.xxx.xxx

Edit The “my.cnf” mysql Configuration File

you have to edit this file and add your public-IP on the following line :

# vim /etc/mysql/my.cnf

add this :

bind-address    = 240.125.xxx.xxx

and the rest of configuration file, should be look like this :

user = mysql
pid-file = /var/run/mysqld/mysqld.pid
socket = /var/run/mysqld/mysqld.sock
port = 3306
basedir = /usr
datadir = /var/lib/mysql
tmpdir = /tmp
language = /usr/share/mysql/English
bind-address = 240.125.xxx.xxx

Save and Close The File

you have to restart the mysql service

# /etc/init.d/mysql restart

Grant Access to Any Remote IP Address

example parameter :

Database  : myDatabase

User           : root

Password : password

remoteIP : ANY


connect and login to database :

# mysql -u root -p

enter this command :

# mysql> GRANT ALL ON myDatabase.* TO root@’%’ IDENTIFIED BY ‘password’;

logout from mysql

# mysql> exit

ok, now you can try to access and remotely query or add or whatever you want to your database.


Thanks for Reading

Regards

Tommy Agustianto

Enabling Remote Access to MySql

current loop

hai…

I’d like to explain about current loop which usually used in instrument and process control systems, remember… CURRENT LOOP not CURRENT LOVE, hahahahaha…stt… dont curcol on the blog please. hihi.

okeh..

1. what do you know about 4-20mA?

2. why we transmits a current not voltage?

3. how to measure a current loop?

4. how to generate a simple current loop from a microcontroller?

5. how its use? 4-wire? 2-wire?

6. what systems that applicable for this?


lets study one by one, I’m  not smart, but maybe I’m one step ahead from you.

CASE I

4-20mA :

First appearing in the 1950’s with the advent of electricaland electronic controls, the 4-20mA signal standard reigns
as one of the most popular mediums for signal transmission and electronic control in industrial environments nearly
60 years later, at that year Indonesia still playing sharp bamboo.

Prior to the widespread adoption of electrical and electronic controls, buildings often used pneumatic control
systems. Large and powerful compressors drove 3psi to 15psi pneumatic signals throughout a plant and these
pneumatic lines connected to pneumatically controlled valves and pneumatically controlling valves in order to drive
proportional controls and actuators throughout the building, all powered from compressed air. Air pressure at 3psi
served as the “live-zero” and 15psi represented 100%. In this way, the more modern 4-20mA signal standard
emulated the earlier 3-15psi pneumatic controls. Any pressure below 3psi was considered “dead zero” and an alarm
condition. Some installations still use pneumatic control today. Modern I/P converters (current-to-pressure
transducers) are available to convert the 4-20mA control loops to common pneumatic ranges, such as 3-15psi, 1-18psi, 3-27psi, and 6-30 psi.

now, lets see this triangle | relation between R.I.V R(Resistance)/I(Current)/V(Voltage).

Current Loop

From the triangle, I can quickly identify the three common components of a current loop, how they are wired together,
and even the direction of current flow. For my mental model, each side of the triangle represents a component of the
current loop. The vertices of the triangle represent a wired connection between these components. For reference, I
also place a positive/plus sign on the “peak” of the triangle. I will also use the first three letters of “TRIangle” to
identify the principle components. Accepting the convention that current flow will move from the supply positive to
and return to the supply negative, I see that current moves counter-clockwise in my symbolic current loop.

Thats enough for phase one, I’ll continue later…


current loop